
Remember when your tile floor was first installed? The clean lines, the uniform color, the satisfying gleam. Over time, however, the unsung hero holding it all together—the grout—often becomes the villain. It absorbs dirt, succumbs to mildew, and develops a dingy discoloration that can make even the most beautiful tile look old and neglected.
Many homeowners resign themselves to this fate, assuming that aggressively scrubbing with harsh chemicals is the only answer, or that a complete re-grouting is inevitable. The good news is that restoring your grout to its former glory is entirely achievable. With the right techniques, a bit of elbow grease, and a clear plan, you can transform your tile surfaces and make them look brand new again.
This comprehensive guide will walk you through every stage of the process, from initial preparation to long-term maintenance. We'll explore safe and effective DIY cleaning solutions, outline a foolproof five-step cleaning method, and reveal the single most important action you can take to keep your grout pristine for years to come. Get ready to say goodbye to grimy grout lines and hello to sparkling clean floors and walls.
Key Takeaways
- Preparation is paramount: Always start by gearing up with safety equipment and thoroughly sweeping or vacuuming the area to remove loose debris before you begin cleaning.
- Choose the right cleaner: Homemade solutions like baking soda paste are excellent for general cleaning, while commercial products may be needed for deep-set stains. Always avoid using acidic cleaners like vinegar on natural stone.
- The process matters: A successful cleaning job involves five distinct steps: applying the cleaner, letting it dwell, scrubbing vigorously, rinsing thoroughly, and drying completely.
- Sealing is not optional: Grout is a porous material that readily absorbs dirt and spills. Applying a quality grout sealer creates a protective barrier that prevents future stains and simplifies maintenance.
- Consistency is key for longevity: Regular light cleaning, wiping up spills immediately, and planning to deep clean and reseal every one to two years will keep your grout looking its best.
- Know when to call a professional: For widespread, stubborn issues or for maintaining other surfaces in your home, professional services offer expertise and specialized equipment.
Before You Begin: Essential Prep Work & Tools
Jumping straight into scrubbing without proper preparation is a recipe for frustration and mediocre results. Taking just 15-20 minutes to prepare your space and tools will make the entire process smoother, safer, and significantly more effective. Think of it as setting the stage for a successful tile restoration project.
Safety First: Gear Up!
Even when using gentle, homemade cleaning solutions, protecting yourself is non-negotiable. Grout cleaning can be messy work, and you want to shield your skin, eyes, and lungs from splashes and potential fumes.
- Gloves (rubber or nitrile): Your hands will be in direct contact with cleaning agents and dirty water. A good pair of waterproof gloves will prevent skin irritation, dryness, and contact with grime.
- Safety goggles: When you're scrubbing, it's very easy to splash cleaner and debris into your eyes. A simple pair of safety goggles provides an essential shield against painful and potentially damaging accidents.
- Ensure proper ventilation: Open windows and doors, and turn on a ventilation fan if you have one, especially in small spaces like bathrooms. This helps dissipate any fumes from your cleaning solutions, whether they are commercial or a simple vinegar mixture.
Assembling Your Cleaning Toolkit
Having all your tools ready before you start means you won't have to stop mid-scrub to find something. Most of what you need is likely already in your home.
- Stiff-bristled grout brush: This is your primary weapon. A dedicated grout brush has angled bristles that are designed to fit perfectly into grout lines. In a pinch, a firm, old toothbrush will work for small areas.
- Spray bottle: A spray bottle is perfect for applying liquid cleaners like a vinegar-water solution evenly and efficiently across the grout lines.
- Microfiber cloths: These are super absorbent and great for rinsing and drying. Their texture helps lift and trap loosened dirt without leaving lint behind.
- Bucket: You'll need one bucket for your clean rinse water and potentially another to mix your cleaning solution. A two-bucket system prevents you from reapplying dirty water to your floor.
- Optional Tools: For a serious deep-cleaning session, a steam cleaner can be a game-changer, using high-pressure steam to dissolve dirt without chemicals. A wet/dry vac is also incredibly useful for sucking up all the dirty water after rinsing, ensuring no grime is left behind.
Prepare the Surface
The most effective cleaning solutions can't work if they're sitting on top of a layer of dust and hair. A clean starting surface is essential.
First, clear the area of all movable items. This includes rugs, furniture, trash cans, and any other objects on the floor or countertop. You need unobstructed access to all the tile and grout you plan to clean.
Next, sweep or vacuum the floor thoroughly. Pay close attention to corners and edges where debris tends to accumulate. This step removes all the loose dirt, dust, and hair, allowing your chosen cleaner to directly attack the deep-set grime in the grout lines.
Choosing Your Cleaning Solution: DIY vs. Commercial
With a clean surface ready, your next decision is what to clean it with. The cleaning aisle offers a dizzying array of options, but some of the most effective solutions can be made with simple household ingredients. The right choice depends on the type of tile you have and the severity of the staining.
Powerful Homemade Grout Cleaners
For most common grout issues, a DIY solution is not only cost-effective but also gives you control over the ingredients you're using in your home. These methods are surprisingly powerful for tackling everyday dirt and mild discoloration.
- Method 1: The Baking Soda Paste: This is the gentlest and most versatile option. Simply mix baking soda with a small amount of water until it forms a thick, spreadable paste, similar in consistency to toothpaste. Apply it directly to the grout, let it sit, and then scrub. It’s a fantastic, mild abrasive that lifts grime without scratching the tile.
- Method 2: Vinegar & Baking Soda Foam: For a bit more cleaning power, you can create a satisfying chemical reaction. Start by spraying the grout lines with a 1:1 solution of white vinegar and warm water. Then, apply the baking soda paste on top. The combination will foam and bubble, which helps to mechanically loosen dirt from the porous grout.
- A critical caution: Never use vinegar or any other acidic cleaner on natural stone like marble, travertine, or limestone. The acid can etch and permanently damage the stone's surface. Always stick to pH-neutral cleaners for these materials.
- Method 3: Hydrogen Peroxide Power: If you're dealing with tougher organic stains or mildew, hydrogen peroxide is an excellent choice. Create a paste using baking soda and hydrogen peroxide instead of water. This combination is particularly effective at whitening and brightening dingy grout.
- Method 4: Oxygen Bleach: A fantastic, safer alternative to harsh chlorine bleach is powdered oxygen bleach (like OxiClean). When mixed with water, it releases oxygen ions that break down stains and odors. It's color-safe, biodegradable, and an effective whitener for stubborn mildew stains.
When to Use a Commercial Grout Cleaner
Sometimes, DIY solutions just don't cut it. For heavy-duty grease in the kitchen, stubborn soap scum in the shower, or deep-set stains that have been there for years, a specially formulated commercial cleaner is your best bet.
When choosing a commercial product, it's important to understand the difference between cleaner types. pH-neutral cleaners are designed for regular, daily, or weekly use and are safe for most surfaces, including natural stone. For a deep cleaning session, you might need something stronger. Alkaline cleaners are excellent at breaking down grease and oils, while acidic cleaners are best for removing mineral deposits and hard water stains, but must be used with extreme caution and never on natural stone.
The Ultimate 5-Step Grout Cleaning Process
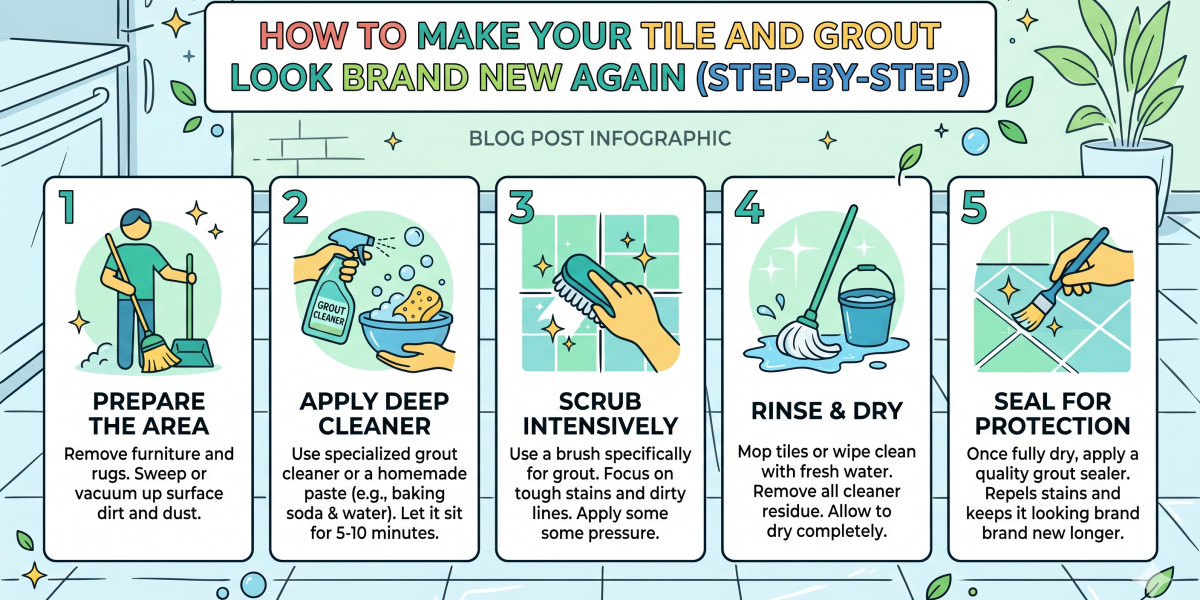
Once you've done your prep work and selected your cleaner, it's time for the main event. Following these five steps in order will ensure a systematic and effective cleaning that yields the best possible results.
- Step 1: Apply Your Chosen Cleaner
Whether you're using a paste, a spray, or a commercial liquid, apply it liberally and directly onto the grout lines. For pastes, an old toothbrush or a small spatula works well to spread it evenly. For liquids, a spray bottle provides excellent coverage. Your goal is to completely cover the grout without flooding the entire tile surface.
- Step 2: Let it Dwell
This is a step people often skip, but it’s one of the most important. Allow the cleaning solution to sit on the grout for at least 5 to 15 minutes. This dwell time gives the active ingredients a chance to penetrate the porous grout and break down the molecular bonds of the dirt, grime, and stains. Do not let the cleaner dry out; if it starts to dry, you can lightly mist it with water.
- Step 3: Scrub with Vigor
Now it's time for some elbow grease. Using your stiff-bristled grout brush, scrub the grout lines in a back-and-forth or circular motion. You'll begin to see the grime lifting away from the grout. Apply consistent pressure and work in small, manageable sections of about three to four square feet at a time.
- Step 4: Rinse Thoroughly
Once you’ve scrubbed a section, it's time to remove the dirty slurry of cleaner and grime. Use a clean microfiber cloth dipped in fresh, warm water to wipe the area clean. Rinse your cloth frequently in a separate bucket of clean water to avoid spreading the dirt around. A thorough rinse is essential to prevent a dull film, often called grout haze, from forming on your tiles as they dry.
- Step 5: Dry Completely
After the final rinse, dry the entire area with a clean, dry microfiber towel. Alternatively, you can aim a fan at the surface to speed up the air-drying process. It is absolutely essential that the tile and grout are bone-dry before you even think about moving on to the final, protective step.
The Final Step: Sealing Your Grout to Keep it Clean
If you take away only one thing from this guide, let it be this: you must seal your grout. Cleaning your grout without sealing it is like washing your car and leaving it in a dust storm. You’ve done all the hard work, and sealing is the insurance policy that protects it.
Why Sealing is a Non-Negotiable Step
Grout is fundamentally a cement-based, porous material. This means it's filled with tiny holes that act like a sponge, readily absorbing moisture, dirt, oils, and bacteria. This is why unsealed grout becomes stained and discolored so quickly.
Sealing your grout fills in these pores and creates a protective barrier on the surface. This barrier prevents spills and dirt from penetrating the grout, making them sit on the surface where they can be easily wiped away. A properly sealed grout line is stain-resistant, easier to clean, and stays looking new for much longer.
How to Apply Grout Sealer
Applying sealer is a task that requires patience and precision, but it's not difficult.
First, choose the right sealer. Penetrating sealers are the most common and effective type for cement-based grout, as they soak into the grout to create a durable, invisible shield. Membrane-forming sealers create a topical coating, which can be effective but may peel over time.
Next, apply the sealer. Most grout sealers come in bottles with a small applicator brush or roller wheel. Carefully apply a thin, even coat of the sealer directly onto the grout lines. Be meticulous and try to avoid getting too much sealer on the tile itself.
Keep a clean cloth handy to wipe away any excess sealer from the tile surface immediately. If left to dry on the tile, some sealers can leave a hazy residue that is difficult to remove. Finally, let the sealer cure completely according to the manufacturer's instructions, which typically takes 24-48 hours. During this time, keep the area dry and free of traffic.
Maintaining Your Brand-New Looking Grout
Now that your grout is clean and sealed, a simple maintenance routine will keep it that way. The key is proactive floor care, which prevents deep-set grime from building up in the first place. This approach to home maintenance is always more effective than reactive deep cleaning. For instance, The National Association of Realtors reports that targeted home improvements, including ensuring clean surfaces, can increase a home's value by 1-5%.
- Wipe up spills immediately. Since the grout is sealed, spills like coffee, juice, or sauce will bead up on the surface instead of soaking in. Wipe them away promptly before they have a chance to challenge the sealer.
- Use a squeegee on shower walls. After every shower, take 30 seconds to squeegee water off the tile walls. This simple habit drastically reduces the buildup of soap scum and prevents the growth of mold and mildew.
- Perform a light weekly cleaning. Mop floors or wipe down shower walls once a week with water and a pH-neutral cleaner. This gentle cleaning is enough to handle everyday dirt without degrading the grout sealer.
Just as you'd schedule a professional Carpet Cleaning Reno NV service to maintain your soft surfaces, your hard surfaces need a regular maintenance schedule, too. Plan to deep clean your grout and apply a fresh coat of sealer every 1-2 years, or more often in high-traffic areas like entryways and kitchens.
Frequently Asked Questions
What's the best way to clean colored grout?
For colored grout, you should avoid harsh whitening agents like hydrogen peroxide or oxygen bleach, as they can cause fading. The safest and most effective method is to start with a pH-neutral cleaner and a stiff brush. For a DIY approach, the baking soda and water paste is an excellent, color-safe option. Always test any new cleaner on a small, inconspicuous spot first to ensure it doesn't affect the color.
Can I use chlorine bleach on my grout?
It's highly recommended that you do not use chlorine bleach. While it may temporarily whiten the grout, it is extremely harsh and can cause the grout to break down, erode, and become brittle over time. With repeated use, it can actually make the grout more porous and susceptible to future staining. It can also discolor colored grout and damage nearby surfaces. Stick to safer alternatives like oxygen bleach.
How do I remove mold and mildew from grout?
For mold and mildew, you need a solution that will kill the spores, not just bleach the surface stain. A paste made from baking soda and hydrogen peroxide is a great starting point. For more persistent cases, a commercial mold and mildew remover or a solution of oxygen bleach can be very effective. Ensure the area is well-ventilated when treating mold.
When is it time to regrout instead of just cleaning?
Cleaning can work wonders, but sometimes the grout is beyond saving. You should consider regrouting if the grout is deeply cracked, crumbling, or falling out in sections. If you have areas with permanent, deep-set stains that do not respond to multiple deep cleaning attempts, or if the grout is consistently soft or mushy (a sign of water damage behind the tile), it's time to remove the old grout and apply new.